
I've been looking at temporary buildings to house my pigs during the rainy season, and a hoophouse seems to be the best candidate.
For my purposes, a building that can be used for multiple purposes is ideal. In the fall and winter, housing livestock. In the spring and summer, growing things. As a bonus, the deep-litter system that I'm going to try will produce (in theory) good compost, which, helpfully, will be placed right where it's going to be used -- in the greenhouse. Sounds good, right?
I'm going to go a little more expensive in my design by having the greenhouse itself rest on ecology blocks. I'm going to do that so that I use my tractor to move materials into and out of the greenhouse. The easier I can make the maintenance the better it is -- and the more likely that it will get done.
So the project breaks down into three parts:
1) Initial design. How big will it be, what materials will I use, and what will it cost? How much of each material will I need, and where do I get them from?
2) Fabrication. Taking the pipes that form the framework, how do I bend and form them so that they form the hoops that I need. Addition of additional pipes and bracing to make the structure stronger. Placement of the ecology blocks and anchoring the structure to them. Covering the whole thing in plastic. Securing the plastic.
3) Pig prep: Additions to the building that make it likely to survive curious pigs and amenities to make it easier on the farmer -- food and water handling, access doors, and so on.
Initial design
On my farm I have never said "gosh, this building is too large". Ever. With that said, the cost of building a bigger building, or the biggest you can afford, is often well worth it. If nothing else you'll have extra space -- and that's often pretty handy for things you didn't know about. Extra space in your greenhouse means you can store your soils and amendments there, for instance.
Choosing a hoop size
With hoophouses the limiting factor is the size of the plastic cover available, and basic math. Here's an example of a supplier of greenhouse plastic in my area, and from that I can see that I can get plastic sheets in sizes up to 100'x48', and no bigger. Here's a table of greenhouse sizes and the maximum hoop size for each one:
Plastic cover width/Max hoop size
48'/30'
40'/25'
36'/23'
32'/20'
20'/13'
16'/10'
Other covering choices considered:
You can get larger covers; they're called hay tarps, and you can order them in any size. there are also fabric barns that get their fabric from somewhere; I chose to do a transparent plastic covering because I want to use it as a greenhouse, too. If I were doing a permanent pig barn, I'd seriously consider figuring out who makes the coverings for fabric barn resellers and getting a light colored fabric cover made.
I'm assuming that the plastic covers the entire arch, from end to end, as well. You could shorten it a bit with a pony wall.
The shape of the hoop is strongest if it's a smooth, even arch all the way across. These calculations assume that the shape of the hoop is half of a perfect circle. Here's how I calculated it:
Width of desired hoop / 2 * 3.1415
Note: You might need ladders or scaffolding
This also means that if I have a 30' wide barn, the top of the hoop in the center will be 15' tall. Assembly will require some way to get up there to do the work of putting it together. More on that later. With a traditional use as a greenhouse it would be very difficult to use that extra height. If I were designing to only grow plants and had smaller equipment, I'd consider a shorter greenhouse.
Will it work with the tractor?
With a circle, as you get closer to the edge you'll loose ceiling height, which for me is important to note. I want to get pretty close to the edge of the building with my tractor. The ceiling will be 10' tall 5' in from the base of the hoop. which means that if I put the hoops on 2' ecology blocks, I should be able to get within 2 feet of the wall, which is close enough for me.
(How did I figure that out? The old fashioned way. I drew a circle on graph paper using a pencil and a piece of string. Each square on the graph paper represented 5', and after I drew it I could look to see where the pencil line and graph paper line intersected. You can print graph paper online. )
How much material do I need?
I cheated a little. The picture at the top of this entry is a commercial greenhouse that I bought used, so I've got it as a reference point for building this one; it helps that I've already put one of these together and pretty much know what's involved, and that the design has proven durable enough for my climate.
I'm going to use a 4' hoop spacing, and I'm going to NOT use the truss system that the other greenhouse used. I'm going to try using a heavier, larger pipe to eliminate the need for trusses for tractor clearance purposes.
So here's the math:
Length of complete hoop house / hoop spacing = number of hoops
Width of each hoop / 2 * 3.1415 = length of each hoop
length of each hoop / pipe length = number of feet of pipe you'll need.
For this project: 80' long / 4' spacing = 20 hoops
30' wide hoops / 2 * 3.1415 = 47.1 feet per hoop (round up)
48 / 10' pipe length = 5 sticks of pipe per hoop (round up)
100 10' long pipes will form the hoops
You'll also want purlins -- pipes that run the length of the structure, usually one on either side, and one along the top. The design I'm looking at (see picture at top) has 5 of them. Two on each side, one along the top. I'm going to copy that directly.
80' x 5 = 400' of purlin, or 40 10' lengths.
Purlins can be smaller than the hoop pipe. I'm going to be using 1.5" or larger pipes for the hoops, but the purlins will be smaller: 1 3/8" pipe, or 1" pipe. The purpose of the purlin is the keep the hoops in position to stiffen the structure.
One thing that the greenhouse design doesn't have is diagonal bracing at either end. I'm going to add diagonal braces to strengthen the ends of this structure, one on each corner. I want the braces to be attached to 4 hoops, so I'm going to make them about 20' long, each.
80' of purlin-sized pipe for diagonal bracing.
Prices and sources; next entry.


5 comments:
I'm curious why you are building from scratch. Rolling the EMT/Conduit will be an unpleasant task without a powered roller ($$$$, or $$$ to get someone to do it for you). EMT is already galvanized, so you won't be able to weld it without fumes/annoying grinding. Coping the tubes is also a real pain without the proper tools. Then that joint will eventually rust no matter what you do with paint.
Seems you can't beat pre-built ones such as the many options here:
http://www.farmtek.com/farm/supplies/cat1a;ft1_tension_fabric_buildings.html
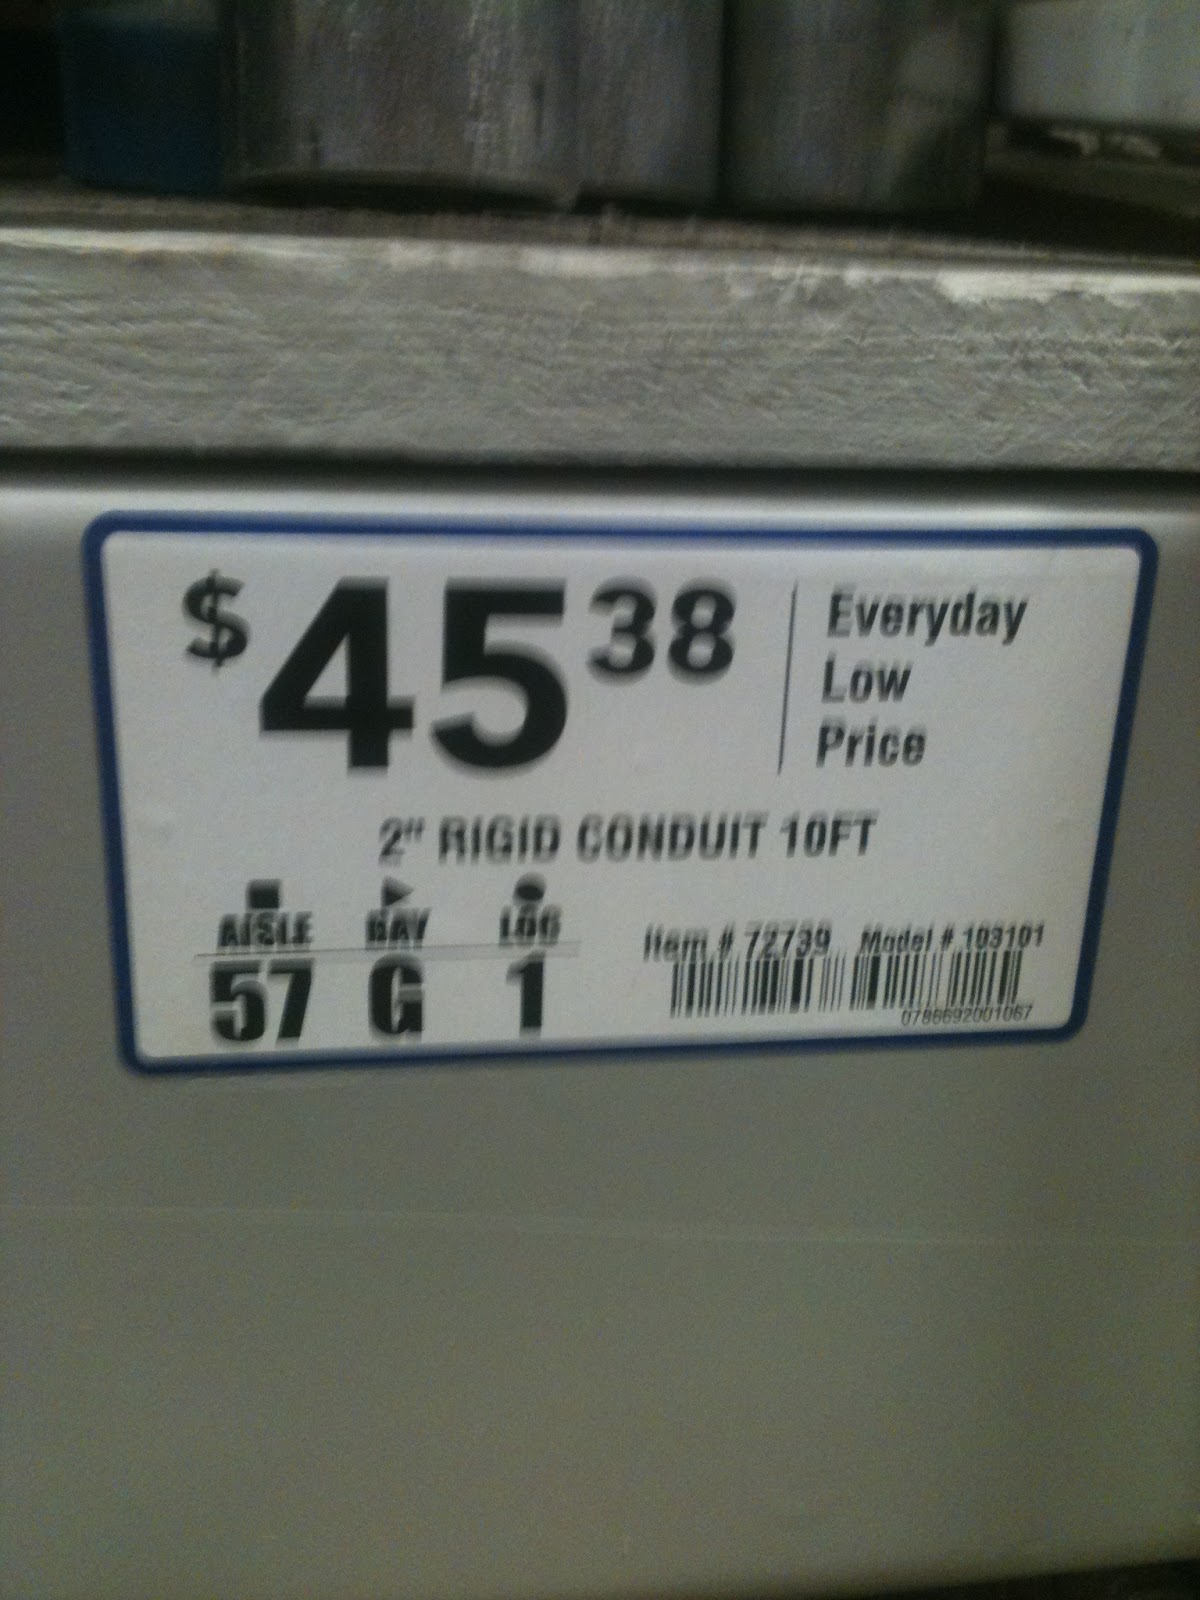
One of the reasons that I was looking at electrical conduit was that a big electrical contractor was auctioned off last week. I purchased a couple of thousand feet of conduit at $6-8/stick, which made it cheap enough to use for this purpose; plus I like a challenge.
I'm not going to weld it. the swage or thread will connect the pipes together. With respect to bending, that's going to a challenge, I agree. I could buy a hydraulic tubing bender for $500, but I've got another idea that I think will work better.
The closest thing to what I'm building is at this link:
http://www.farmtek.com/farm/supplies/prod1;ft1_greenhouses_accessories-ft1_hightunnels_1;pgpb01670r4c_PB01730R4C.html
and it costs $5600 + an estimated $700 shipping. I'm going to take that as the line in the sand -- can I do it for cheaper than that?
The fabric barns that they carry are the direction I'd go if I were making a permanent pig barn.
Something like one of these:
http://www.farmtek.com/farm/supplies/prod1;ft1_tension_fabric_buildings-ft1_hd_truss_buildings-ft1_hd_pony_truss;pgt045p.html
You'll note that they are $3,000 more than the equivalent high tunnel hoophouse, but arguably more useful. 45' wide is a nice span.
Ahh, auctions -- I love the projects that come from random auction acquisitions.
A used hydraulic tubing roller will set you back about $4-5K.
new ones:
http://www.baileighindustrial.com/benders/roll/manual-roll-benders.php
This guy is your cheapest manual option:
http://www.harborfreight.com/catalogsearch/result?q=tubing+roller
You may need someone with a lathe to turn dies for you out of the "3 piece die set" depending on your conduit diameter.
I don't ever buy anything with a moving part from Harbor Freight, so count on spending several hours and $$ fixing the tool to make it actually work.
There's another better manual model, i forget the brand, but it's about $1K + dies.
Don't forget the labor to roll them. It takes a while, especially if you are using tubing thicker than EMT. When I rolled some 4' diameter half circles out of 1.5" EMT we ended up hiring two guys from Home Depot to do the job. It took all afternoon to do eight of them.
You can also get joiner pieces to join some diameters of conduit in crosses, T's and unions. Set screws retain. I've seen them retail at Maclendon's hardware.
Another non-hydraulic bender option is http://www.hoopbenders.net
I have used their mini-benders for low-row cover hoops. Their 16-20-24 foot wide PRO hoop benders with a stand are about $520 including shipping to our area.
You can easily bend 17 guage 1 3/8ths inch galvanized fence rail this way. But unless you are going to do several hoop houses it would not be worth the investment.
Also Loy the owner is quite helpful and will walk you through procedures over the phone.
Larry
I looked at hoopbenders.net and seriously considered it. I ended up purchasing an air-over-hydraulic bender for about $500, mostly because I want to do gates and shelters and so on that require a 90 degree bend. I'll be working with it in the next week and will write it up as I go.
Thanks for the link though. If I were bending top rail I'd be using that bender I think.
Post a Comment